
A Dummy Load for Your DC Supply
Jim Hargrave, W5IFP and Larry Higgins, W5EX
Tired of using automotive headlights to load your power supply? Not a good idea, because the initial load is near zero ohms, which may trip your over-current protector. There is a better way, even if you are now using large power resistors for the job.
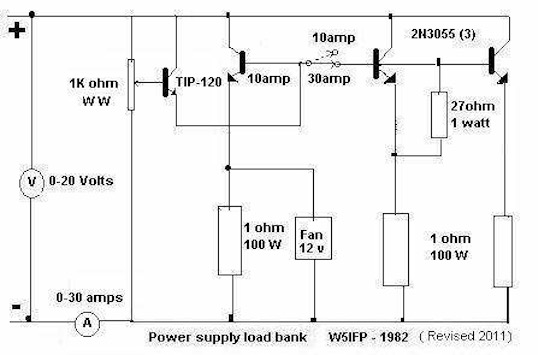
This circuit uses transistors to gently increase the load from nothing to the full dissipation capability of the transistors - in this case 2N3055's. In its present form, the circuit is capable of cranking up to 30+ amperes load. Add another 2N3055 and 1-ohm resistor and you can test a 50+-amp supply. Junk box parts will work just fine.
Application
One of the most important power supply tests is that of the over-current shutdown circuitry. With this device you can set the exact current threshold. In Astron supplies, the resistors labeled R3 and "Rx" set this threshold. As these supplies age, they tend to shut down prematurely. When you are certain that this condition is not due to a weak filter capacitor, weak pass and pass driver transistors or defective base resistors, you may be able to adjust "Rx " such that the current fold-back occurs properly. The shutdown value for an Astron RS-20 is 22-23 A; for the RS-35, it is 37 amperes. The short circuit limit is set by R1 in parallel with R1x - at 2.5 A in the RS-35. Over-voltage in all is limited to 16.5 v by the crowbar circuit. An SCR provides the crowbar. Momentarily short R7 to check the voltage crowbar circuitry. This will drive the output voltage to about 17. 1, 2
Operation
Use # 10 wire (We use speaker wire) to hook to your power supply. Observe polarity. With the Toggle switch in the low current position, turn on your power supply. The meters should show 12+ volts and tiny current draw. Advance the pot slowly while observing the ammeter. Max current in low range will be about 10 amps. If all is well, back off the pot and switch to high range. Load to rating of your power supply. If all's well, back off the pot to the continuous duty rating of the supply (17 amp for an Astron RS-20). Let it cook for a while. When the power supply heat sink is hot, shut off the AC and immediately turn it back on. The power supply must not stumble, but immediately restore the rated continuous duty current and voltage. Repeat this test several times. Remove power, take a break while things cool, return and turn the supply on. Again, no stumble and no shutdown.
Conclusion
With this simple tool, you will be able to check your power supplies such that failure at a remote site can be much less likely. Parts aging in an old supply can be detected such that early replacement may prevent inconvenient failure.
Parts List
- 1 Heat sink capable of mounting three 2N3055's. 1 Chassis, large enough to mount parts
- 1 12vdc3or4inmuffinfan
- 1 Voltmeter, 0-20 volts
- 1 Ammeter, 0-30 (or 50) amps
- 1 Resistor, 27 ohm, 1 watt
- 3 Resistor, 1 ohm, 100-watt ww
- 1 Potentiometer 1K, 1 watt panel mount (w w preferable) 1 Switch, 3 amps, SPST
- 3 Transistors, 2N3055 (or equivalent) 1 Transistor, TIP-120 (or equivalent) 3 Mounting kits for 2N3055
- 1 Mounting kit for TIP-120
- 1 Barrier strip with #10 screws
Assemble the unit with lots of space for airflow. Use #10 wire for the 12-vdc lines #18 for the emitter switching circuitry. Set up the fan to blow on the Heat sink and 1-ohm resistors. Mounting the unit in a case with perforated covers will protect the components and insure good airflow.
1 CA 92718.
2 Service Manual for RM-35A, RM-35M, RS-35A, RS -35M. 1991 Astron Corporation, 8 Autry, Irvine,
Telcon, Tech Service, Astron Corp, 9/09.